Table of Contents
A bootable USB macOS installer offers unparalleled convenience. You can use it to dual-boot your Mac, install macOS on multiple computers, reinstall macOS, and more. The best part? Creating a bootable USB macOS installer is quite simple. We’ll take a look at two methods on how to create bootable macOS installation media, covering multiple macOS versions like macOS Sonoma, macOS Ventura, and macOS Monterey.
Why Does One Need to Make Bootable USB on a Mac?
There are numerous situations when a bootable USB macOS installer may come in handy. You might think that you don’t need it yet, but it is always best to have a flash drive with the needed macOS installation file ready, just in case.
Here’s why you might need a bootable USB macOS installer:
- To wipe your Mac clean and reinstall the operating system. If you want to reset your device and make it look as if it’s new, you can create a Mac bootable USB installer, format the internal drive, boot your Mac from that flash drive, and install the new operating system.
- To dual-boot your Mac. If you want to update your Mac but are not sure whether a particular app will run on the new macOS, or if you simply want to see how a beta operating system version works before choosing to switch to it completely, it’s possible to keep the previous macOS version and install the other one on a separate APFS volume.
- To install the needed macOS on multiple devices. If you have more than one Mac and want to install a new macOS on all of them, you can use a bootable USB macOS installer to speed up the process. This way, you won’t need to wait for the macOS version to download from the web on each of your computers.
- To reinstall macOS when there’s no internet connection. This is that special case when a previously created macOS USB installer can rescue a failing Mac since you won’t even need an internet connection to reinstall its operating system.
- To reinstall macOS even if the Recovery Mode isn’t working. If your Mac is troubleshooting, usually, you’ll need to use Recovery Mode to fix the issues. However, when it’s impossible to boot into this mode, the only way to repair your Mac is by reinstalling macOS from a bootable USB installer.
- To fix one of your Macs. If one of your Macs won’t run properly, you can use your other computer to create a Mac bootable USB, then boot it on the Mac with issues and reinstall its operating system.
What You Need to Make a Bootable USB for Mac?
If this is your first time creating a bootable macOS installer, don’t worry, it’s not as complicated as it may seem, and you’ll need only a few things to do it.
Here’s what you should prepare to make a bootable USB on Mac:
- A working Mac. Of course, you’ll need a computer to create the macOS USB installer.
- A flash drive. You’ll need it to store the selected macOS version.
- The installation file. You’ll need to decide on the macOS version that you need and download the installation file.
- Internet connection. You’re required to have an internet connection to be able to download the needed operating system from the web.
What Kind of USB Will Be Needed?
Not just any flash drive can be used as a bootable macOS installer. When choosing your flash drive, there are two main things that you should take into consideration: its size and type.
The required size of the USB flash drive depends on the macOS version that you wish to load. For example, the macOS Big Sur installer is 12.6GB, so you need to make sure it fits in the drive. Just to be on the safe side, it is best to use a 16GB USB flash drive; the larger it is, the better.
Also, be careful when choosing the USB type and make sure that it fits in your computer. If you have an older Mac with USB 3 ports, you can get the usual flash drive. However, if you have a newer Mac model, you should get either a USB-C flash drive or a USB-C adapter to be able to connect the flash drive with your computer.

You might be wondering whether it’s necessary to buy a brand new flash drive or whether it’s okay to use an old one to create a bootable installer for macOS. So, old or new?
Well, it all depends on whether you have anything stored on that old flash drive or not. Because if you do, you’ll be required to format and erase everything from it. So, if there’s anything important stored on that drive, you should transfer it to a different device before using it or just buy a new one.
Preparing Your USB Flash Drive
Before you can dive into the main process, you’ll need to format your USB flash drive. If it holds any important files, you should back them up since everything will get deleted from the drive.
Here’s how to prepare your flash drive for creating a bootable macOS installer:
- Head to Launchpad from the Dock. Type Disk Utility in the search field and click it to open.
- On the left side, you can see a list of all drives. Search for your USB flash drive under the External section. Then click Erase.
- If you wish, you can enter a new name for your flash drive in the Name field. Also, make sure to choose the Mac OS Extended (Journaled) format for your drive and the GUID Partition Map scheme.
- Click Erase to confirm.

That’s it! Now that you have your USB drive ready, you can move on to the next step.
Downloading the macOS Installer File
The easiest way to grab a macOS installation file is directly from Apple’s App Store. But unfortunately, depending on the operating system that your Mac is currently running, some of the older macOS versions might be impossible to download from there.
Here’s how to download macOS installer files:
⚙️ macOS Sonoma
You can download the latest version of macOS, macOS Sonoma, from the App Store. Simply search for it on the App Store, or visit the macOS Sonoma App Store page. To download it, click on Get, and then click Download.
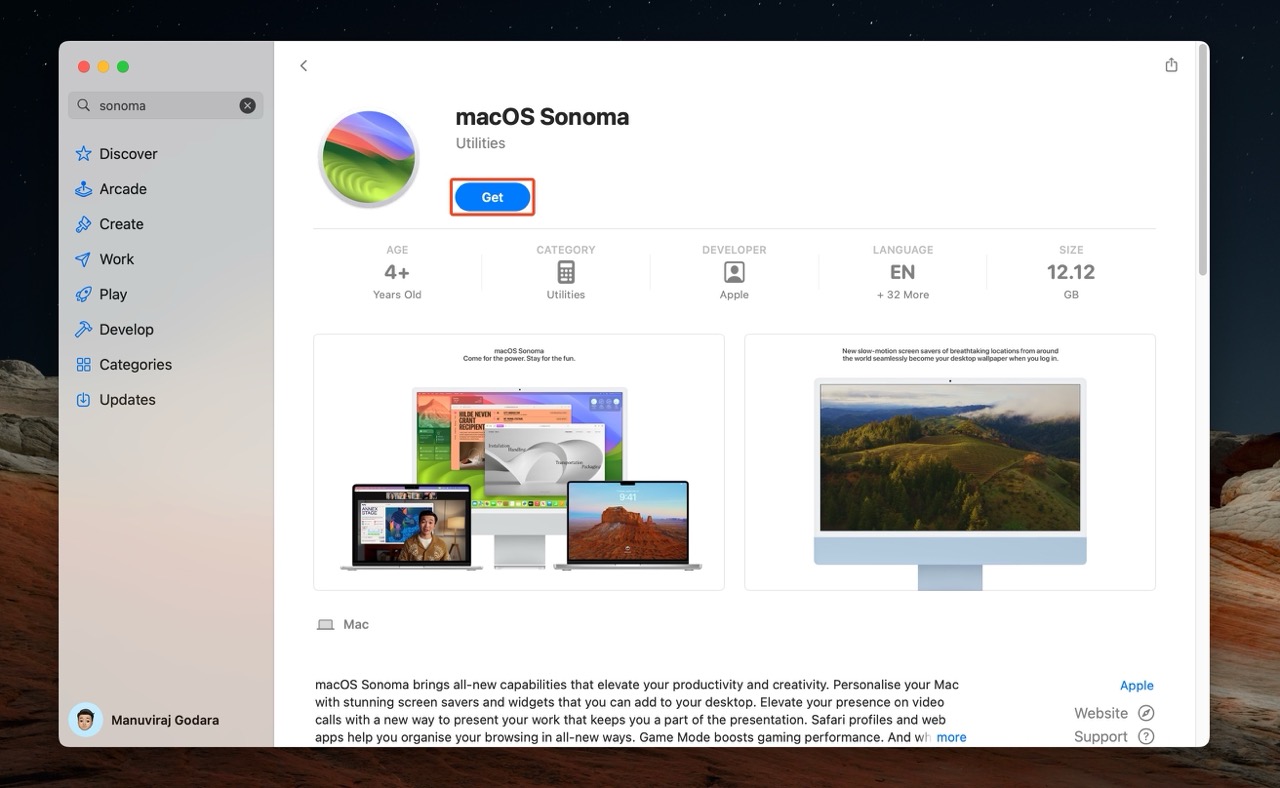
The download size is 12.12 GB.
⚙️ macOS Ventura
The easiest way to download the macOS Ventura installer is from the App Store on your Mac. To do that, simply click the App Store icon on the Dock to open the application and type in macOS Ventura in the search field. Then click the Get button to start the download.

⚙️ macOS Monterey
The macOS Monterey installer is available for download via App Store. So to get this Mac operating system version, launch App Store on your computer and type macOS Monterey in the search field. Choose the needed installer and then click Get to start downloading it.
It may take a while for the installer to download since it comes in at slightly over 12GB in size. So be patient, you might need to wait even several hours to download macOS Monterey on your computer.

⚙️ macOS Big Sur
You can download the macOS Big Sur installer through the App Store. To do it, open the App Store app on your Mac, type in macOS Big Sur in the search field, and hit Return. Then click Get, wait for a pop-up window to appear, and click Download to confirm. Or simply click here to head to the download page.

It may take a while for the file to download since this operating system is 12GB large.
⚙️ macOS Catalina
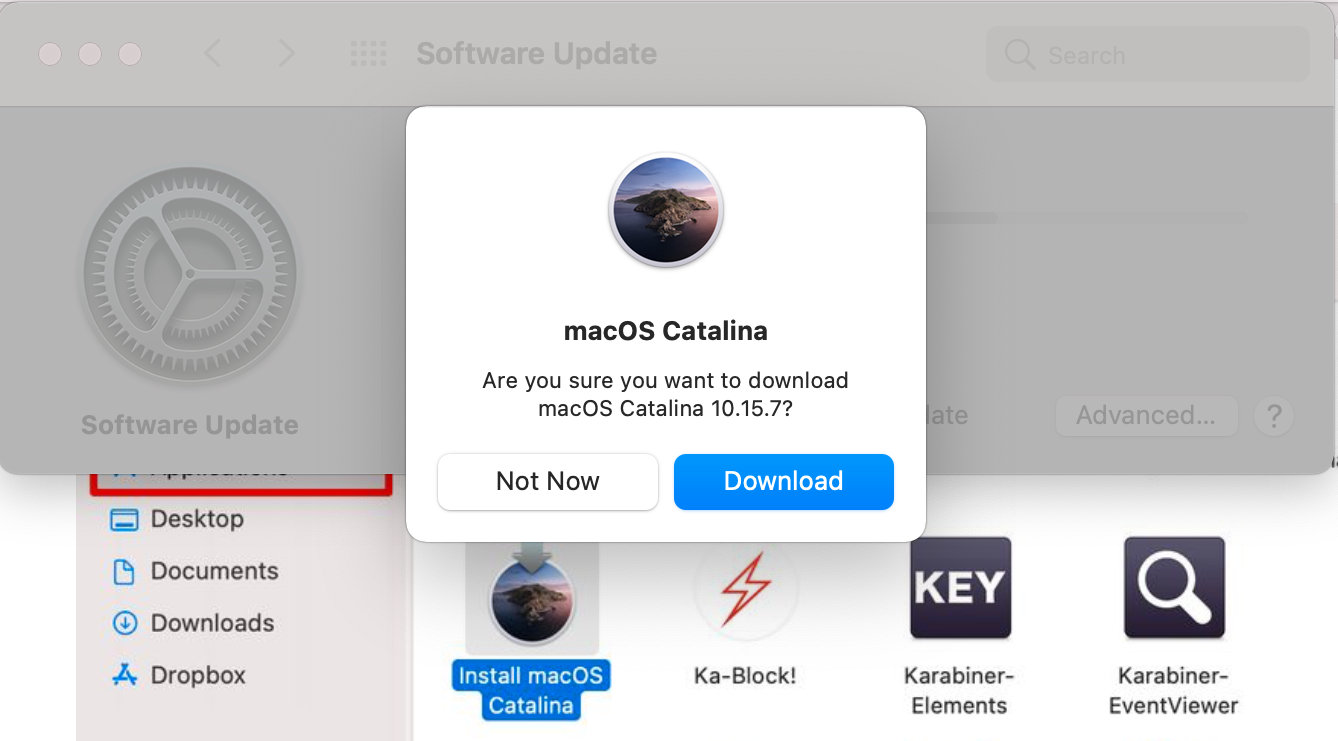
The macOS Catalina installer is also available via Apple’s App Store. Just click Get and wait for the Software Update window to appear. In a few seconds, another pop-up window will appear asking you to confirm whether you wish to download macOS Catalina. Click Download to confirm.
⚙️ beta installers
If you are eager to try out the beta version of the latest macOS, you need to sign up for the beta program or register as an Apple developer. The Apple Beta Software Program is free for everyone to join, while the latter costs $99 per membership year.
⚙️ older installer files
If you’d rather run an older macOS version, you can also find the needed installation files through the App Store. Here are the links for downloading macOS Mojave or macOS High Sierra:
All you need to do is click on the needed link. You’ll be directed to the App Store. To start the download, simply click Get, wait for a pop-up to appear, and then click Download to confirm. You’ll be able to find the downloaded installer in your Applications folder.

The older Mac operating system versions, such as macOS Sierra, OS X El Capitan, and OS X Yosemite, can be downloaded via browser. But don’t worry, these files are safe since they are provided by Apple.

To start the download, simply click the needed macOS version. Here are the links that lead to the installers:
You can download even older macOS installation files via Apple Store (OS X Mavericks, OS X Mountain, OS X Lion) only if your Mac is running OS X Yosemite or older. You’ll spot the files in the App Store under the Purchased section. However, if you never downloaded that operating system version, you won’t be able to locate the needed file.
So, if your computer is running OS X Yosemite or older, here’s how to find the older macOS installation files:
- Head to the App Store on your Mac and sign in to your account.
- Click Purchased.
- Look for the needed macOS version on the list. Click Install to download the installation files.
The official Apple site also offers the chance to download the older macOS versions. Until recently, you had to pay to do that, but now they are free for everyone.

To download these operating system versions, click the needed link:
Now that you’ve prepared your USB drive and downloaded the needed macOS version, you are ready to move on to the most important part of the process.
Creating a Bootable USB Drive on Mac
Basically, there are two ways you can make a bootable USB on Mac: by the help of a third-party app or through Terminal.
It might look like the second option is better since you won’t need to install a new app. However, since that method entails entering createinstallmedia commands, it is actually much easier to use a third-party app for this job. With such an app, all that you’ll need to do to create a macOS bootable USB installer is to make a few clicks, and the app will do the rest.
Method 1: (Quick & Easy) Create macOS Bootable USB Using Disk Drill
![]()
Third-party apps can simplify creating a macOS bootable USB drive. To demonstrate this, we used Disk Drill to create macOS installation media. The app’s user-friendly interface makes the process so much easier, allowing you to skip the entire ordeal of typing in commands within the macOS Terminal.
Before proceeding further, ensure you have a USB drive (with at least 16 GB storage capacity) at hand. Using the USB drive as a macOS installer will result in it being formatted, so remember to copy all important files to another location.
Here’s how you create a bootable macOS installation USB drive using Disk Drill:
- Download Disk Drill and install it.
- Connect the USB drive to your Mac, and open Disk Drill.
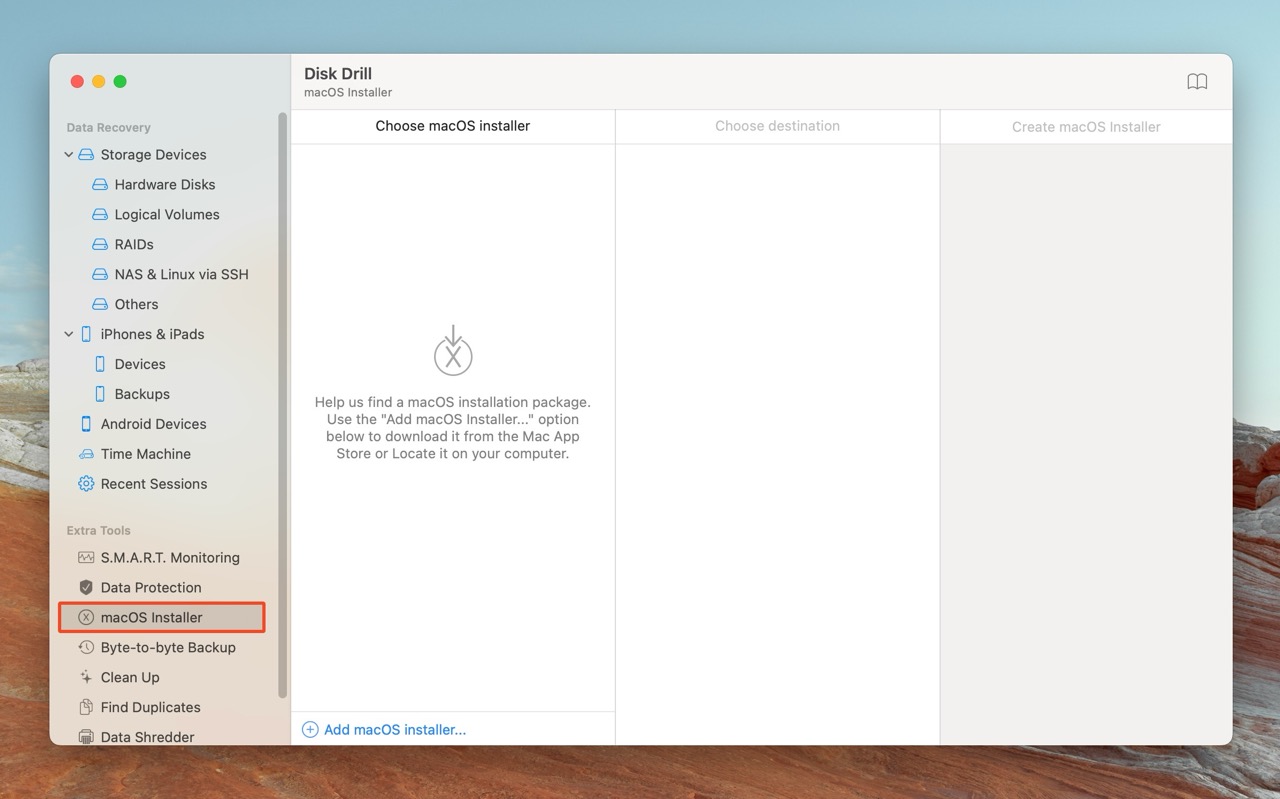
- Click macOS Installer, under Extra Tools, in the left navigation bar.
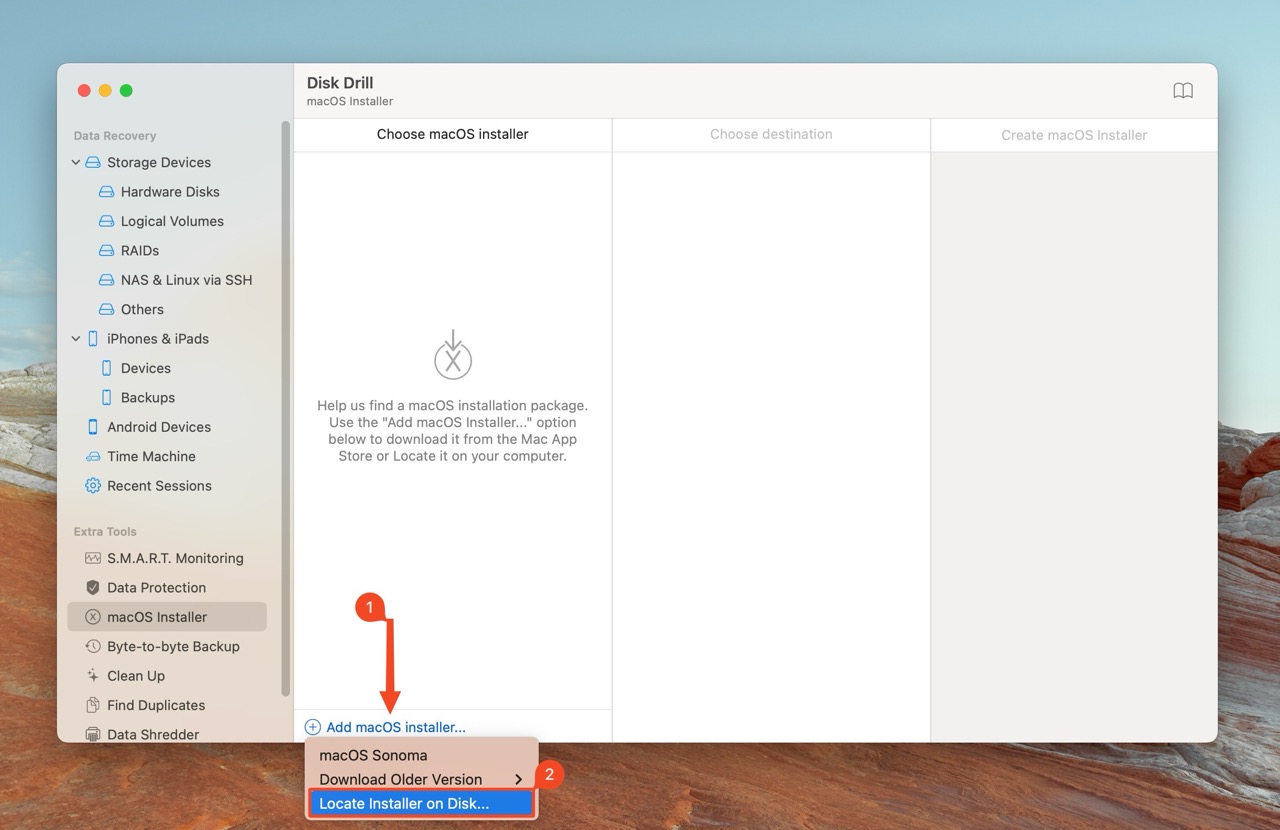
- Click on Add macOS Installer. Click on Locate Installer on Disk, if you’ve already downloaded the required macOS version. Otherwise, you can opt to download the current, and older versions of macOS by clicking the relevant options.
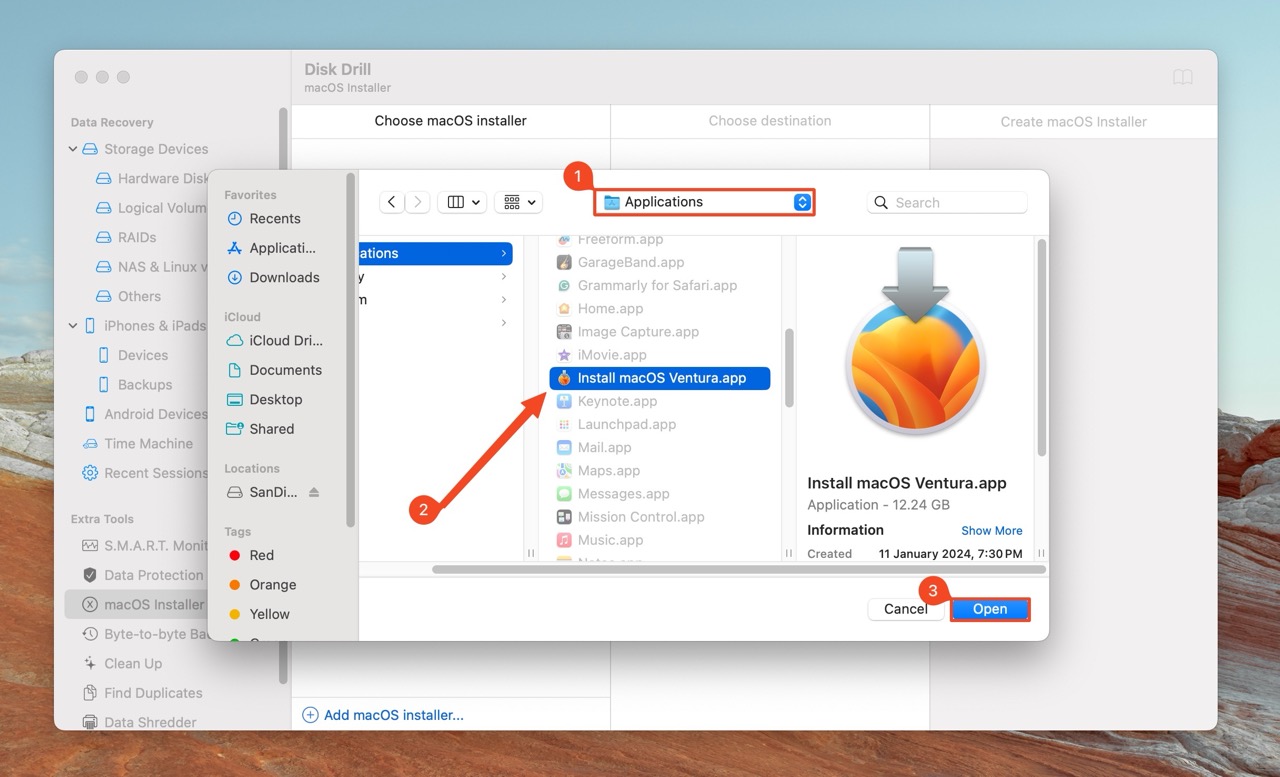
- Locate the macOS installer in the Applications folder, select it, and click Open.
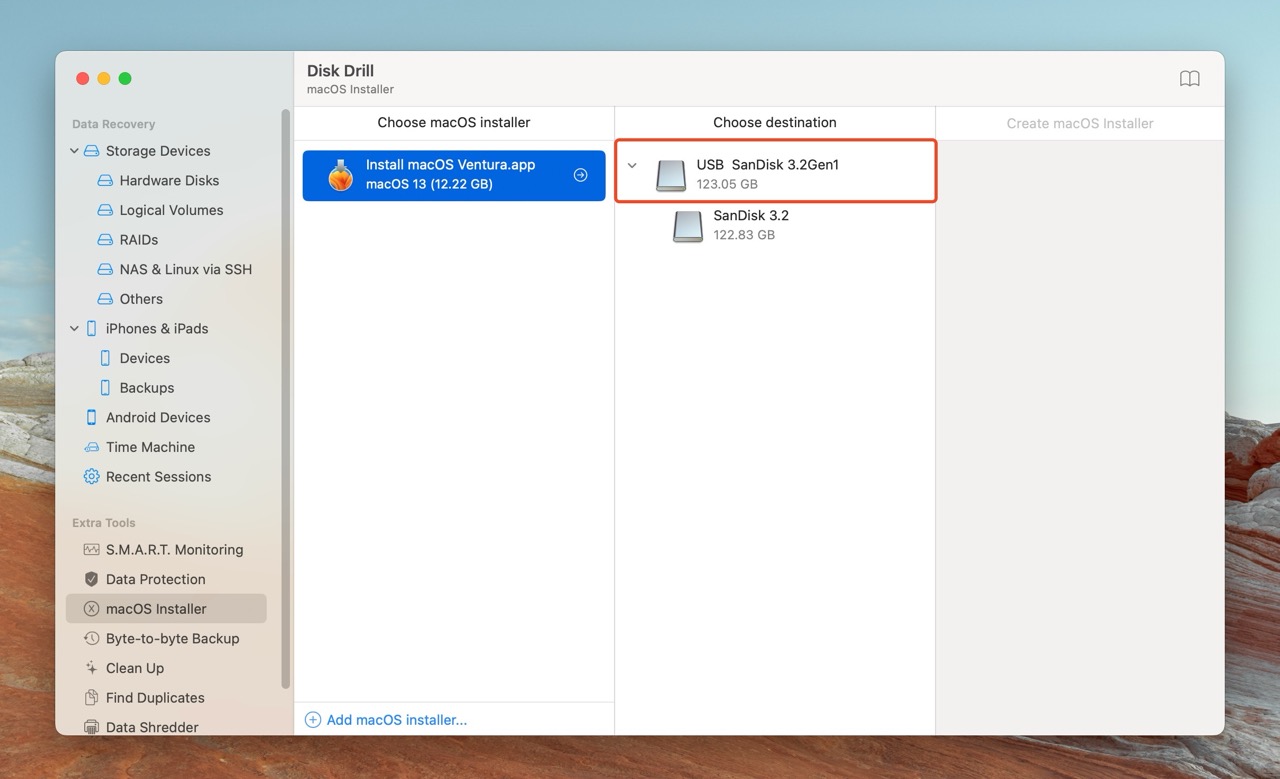
- Select the added macOS installer in the first column, then select your USB drive in the next column, Choose Destination.
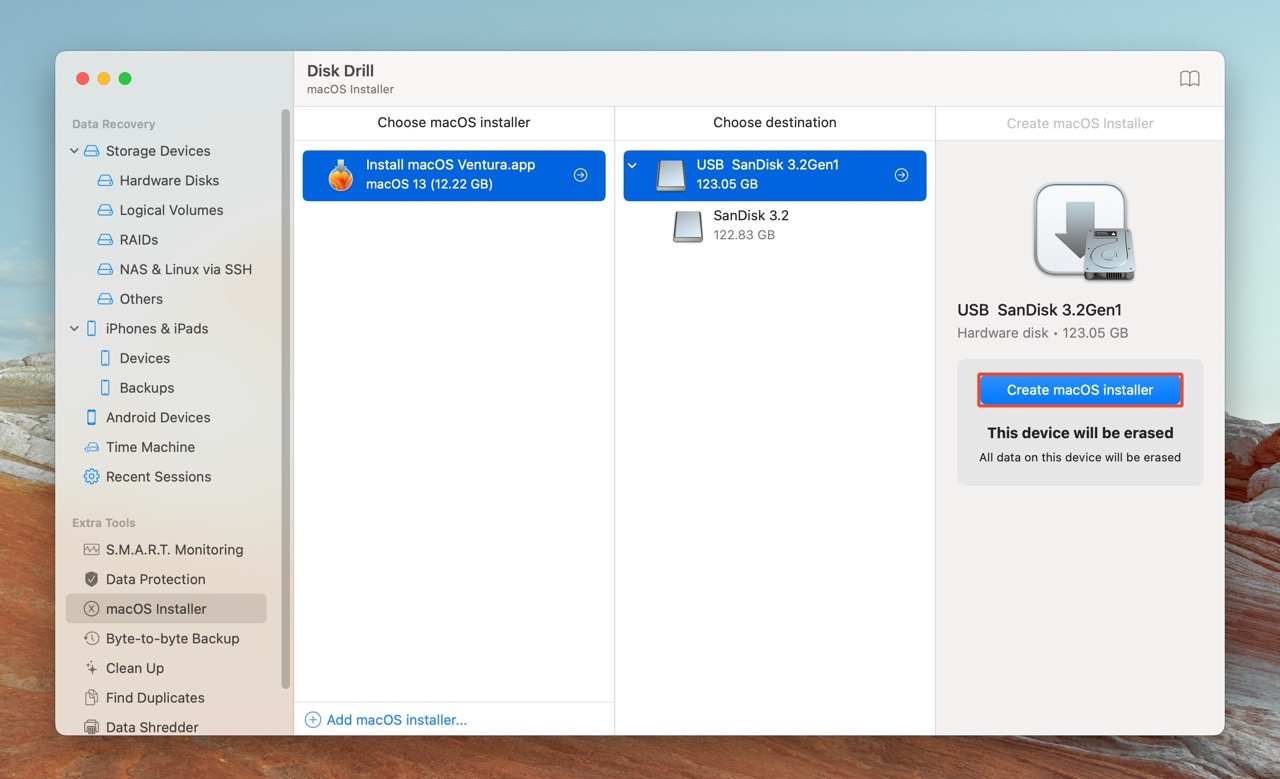
- Finally, click on Create macOS Installer in the next column.
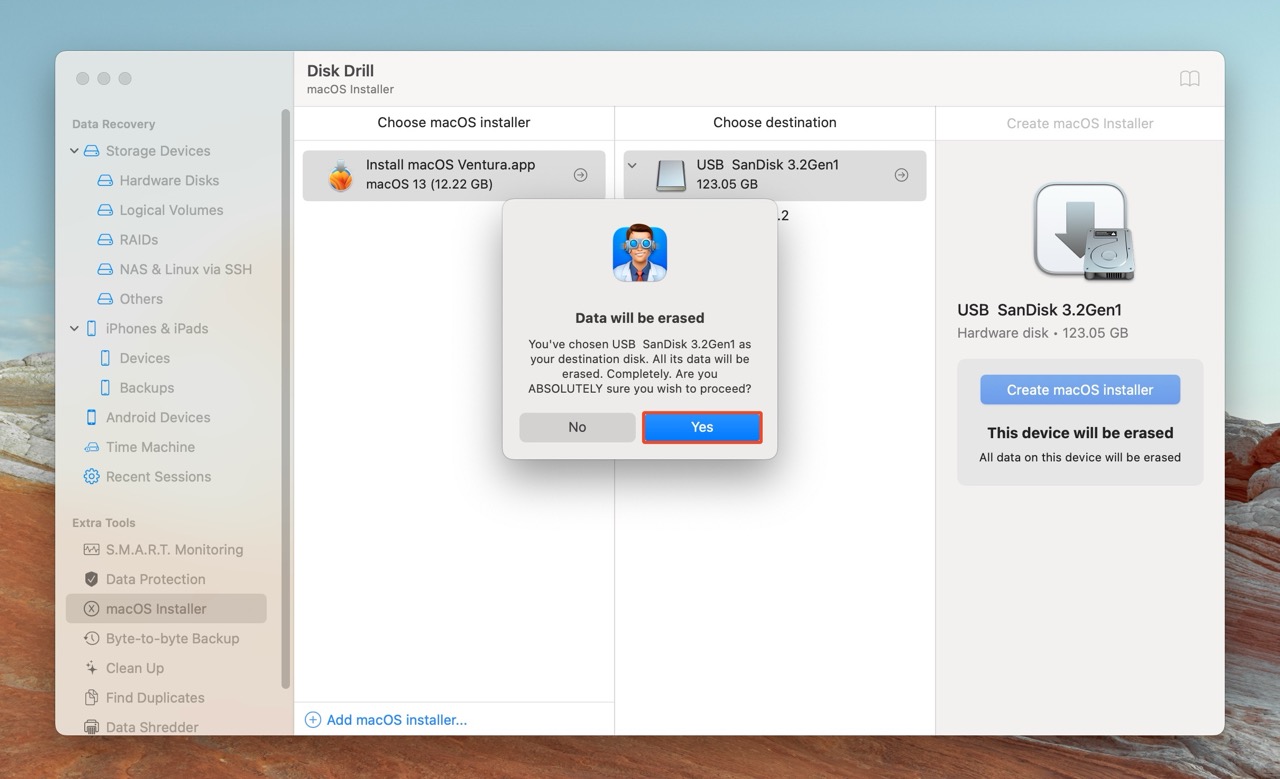
- Click Yes on the next prompt.
- Disk Drill will create the macOS installation USB drive.
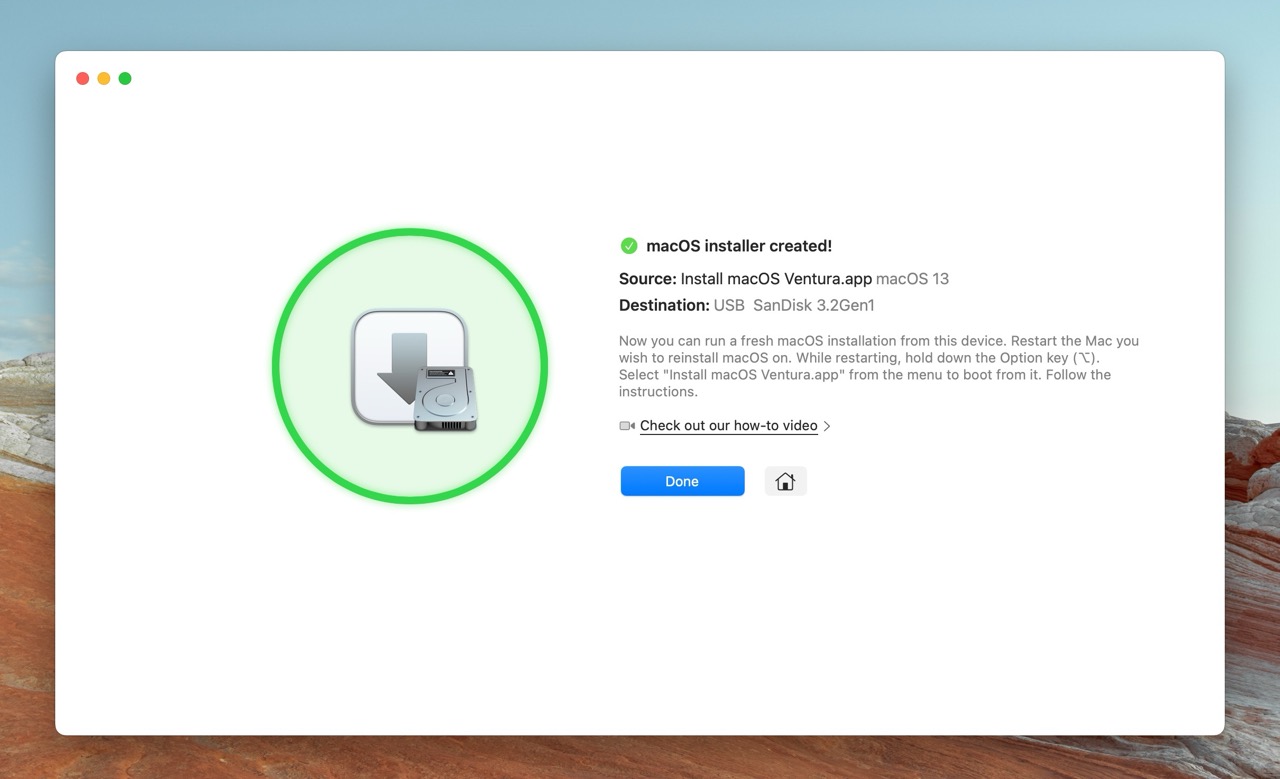
You can now use the USB drive to install macOS on supported devices.
Method 2: (Manual) Make a Bootable USB on Mac via Terminal (createinstallmedia commands)
![]()
If you want to create the bootable USB installer directly via Mac, then the only way to do it is by using Terminal. However, let me warn you, the process is a bit more complicated than the previous one and requires more effort and time.
After you’ve downloaded the needed macOS version, you can connect your USB flash drive to your Mac and start creating the installer. First, you should launch Terminal. To do it, head to Launchpad from the Dock and look for the app (or type Terminal in the search field).
Now, depending on your macOS version, find a suitable command. But don’t hurry into typing in a code just yet. Before doing it, double-check to make sure that the installer is in the Applications folder. Also, these codes imply that your flash drive’s name is MyVolume. If not, either rename it or type in its current name in the place of MyVolume in the command.
Here is the list of the createinstallmedia commands:
Sonoma:
sudo /Applications/Install\ macOS\ Sonoma.app/Contents/Resources/createinstallmedia –volume /Volumes/MyVolume
Ventura:
sudo /Applications/Install\ macOS\ Ventura.app/Contents/Resources/createinstallmedia –volume /Volumes/MyVolume
Monterey:
sudo /Applications/Install\ macOS\ Monterey.app/Contents/Resources/createinstallmedia –volume /Volumes/MyVolume
Big Sur:
sudo /Applications/Install\ macOS\ Big\ Sur.app/Contents/Resources/createinstallmedia –volume /Volumes/MyVolume
Catalina:
sudo /Applications/Install\ macOS\ Catalina.app/Contents/Resources/createinstallmedia –volume /Volumes/MyVolume
Mojave:
sudo /Applications/Install\ macOS\ Mojave.app/Contents/Resources/createinstallmedia –volume /Volumes/MyVolume
High Sierra:
sudo /Applications/Install\ macOS\ High\ Sierra.app/Contents/Resources/createinstallmedia –volume /Volumes/MyVolume
Sierra:
sudo /Applications/Install\ macOS\ Sierra.app/Contents/Resources/createinstallmedia –volume /Volumes/MyVolume –applicationpath /Applications/Install\ macOS\Sierra.app
El Capitan:
sudo /Applications/Install\ OS\ X\ El\ Capitan.app/Contents/Resources/createinstallmedia –volume /Volumes/MyVolume –applicationpath /Applications/Install\ OS\ X\ El\ Capitan.app
Yosemite:
sudo /Applications/Install\ OS\ X\ Yosemite.app/Contents/Resources/createinstallmedia –volume /Volumes/MyVolume –applicationpath /Applications/Install\ OS\ X\ Yosemite.app
Mavericks:
sudo /Applications/Install\ OS\ X\ Mavericks.app/Contents/Resources/createinstallmedia –volume /Volumes/MyVolume –applicationpath /Applications/Install\ OS\ X\ Mavericks.app
Mountain Lion:
sudo /Applications/Install\ OS\ X\ Mountain\ Lion.app/Contents/Resources/createinstallmedia –volume /Volumes/MyVolume –applicationpath /Applications/Install\ OS\ X\ Mountain\ Lion.app
Lion:
sudo /Applications/Install\ OS\ X\ Lion.app/Contents/Resources/createinstallmedia –volume /Volumes/MyVolume –applicationpath /Applications/Install\ OS\ X\ Lion.app
Now that you’ve chosen the suitable createinstallmedia command, it’s time to work in Terminal. Copy-paste the chosen command into Terminal and do the following:
- Press Return on the keyboard.
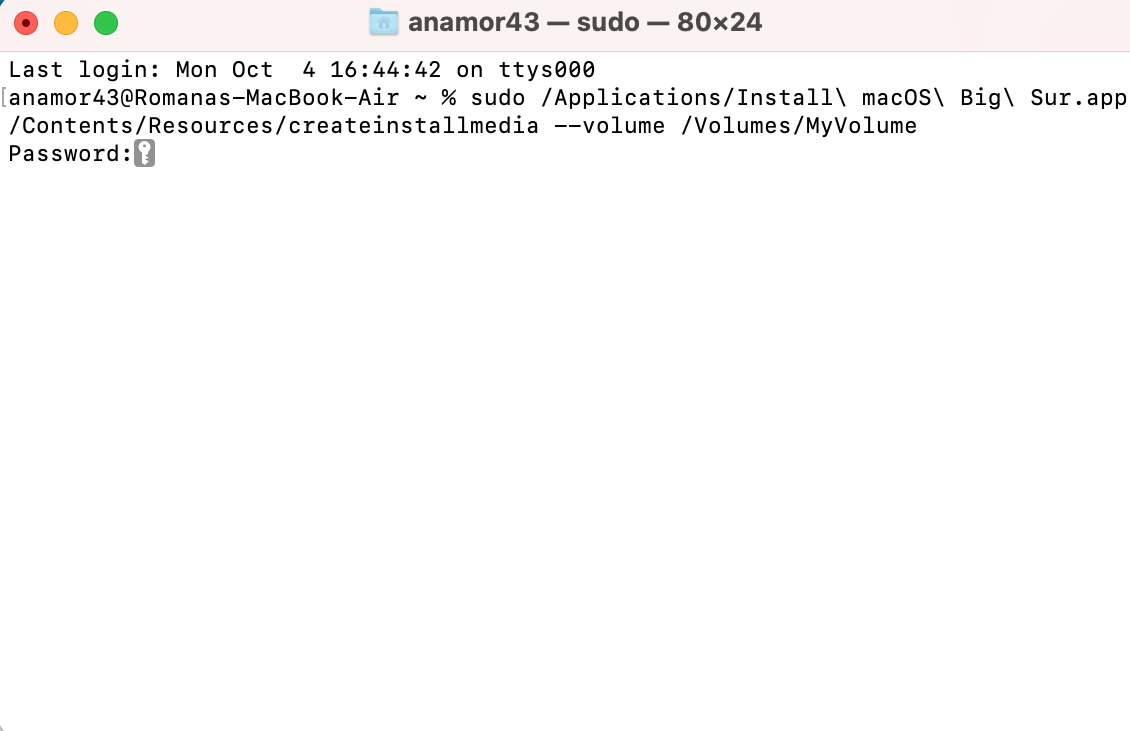
- Then you’ll be asked to enter your administrator password. Type it in and press Return (don’t worry that you don’t see your password as you type it in, that’s exactly how it should be).
- When asked, press Y on the keyboard to proceed and then the Return key.

- If Terminal asks you permission to access files on the removable volume, click OK to allow.
- When Terminal says “Install media now available at…” it means that the process is completed, and you can now quit Terminal.

- Eject the USB flash drive.
How to Use the macOS USB Installer
There is one more thing that you should do before using your macOS USB installer—update your Mac’s startup security settings. The process of doing it depends on the security chip installed on your computer.
If you’re not sure whether your Mac has a chip, head to Apple menu > About this Mac > Overview > System Report, then from the list on the left, click Controller (or iBridge). You’ll see the needed information next to Model Name.
So, here’s how to update the startup security settings on different Macs:
💻 Older Macs (with no security chip installed)
If you have an older Mac with no security chip installed, follow these steps:
- Shut down your Mac and boot it in Recovery Mode. To do it, press the power button and hold Command + R. Release when the Apple logo appears on your screen.
- Click your user account, enter your password, and hit Return.

- When the macOS Utilities window appears, click Utilities, and then click Startup Security Utility.
- Make sure that the firmware password protection is turned off. Otherwise, click Turn Off Firmware Password.
- Shut down your Mac when ready.
💻 Macs with T2-powered chips
If your Mac has an Apple T2 Security Chip installed, do the following:
- Shut down your Mac and boot it in Recovery Mode. To do this, hit the power button and press and hold Command + R until the Apple logo appears on your screen.
- When prompted, enter your password.
- Click Utilities at the top-screen menu and then head to Startup Security Utility.
- Click Enter macOS password and type in your password.
- From the Startup Security Utility window, select Medium Security (under Secure Boot) and Allow booting from external or removable media (under Allowed Boot Media).

- Shut down your Mac when ready.
💻 Macs with M1 chips
Here’s how to change the startup security settings on a Mac powered by M1 chip:
- Shut down your Mac and boot it in Recovery Mode. To do this, press and hold the power button until the Startup Options window appears.
- Choose Options and click Continue to confirm.
- When prompted, type in your password.
- From the top menu bar, head to Utilities > Startup Security Utility.

- Click your system drive and then click Security Policy.
- A new window will appear. Choose Reduced Security and click OK to confirm.
- Shut down your Mac when ready.
Now that you’ve changed the startup security settings on your Mac and have a bootable macOS USB ready, you can finally run the installer. Keep in mind that the process is slightly different on Intel processor Macs and on Apple silicon ones.
Here are step-by-step instructions on how to use the macOS USB installer for both of the Mac types:
- Plug in the USB flash drive into your Mac.
- Turn on your Mac. If you have an Apple silicon Mac, then press and hold the power button while it is still turning on until you see options. With the usual Intel processor Mac, press and hold the Option/Alt key during the start up.
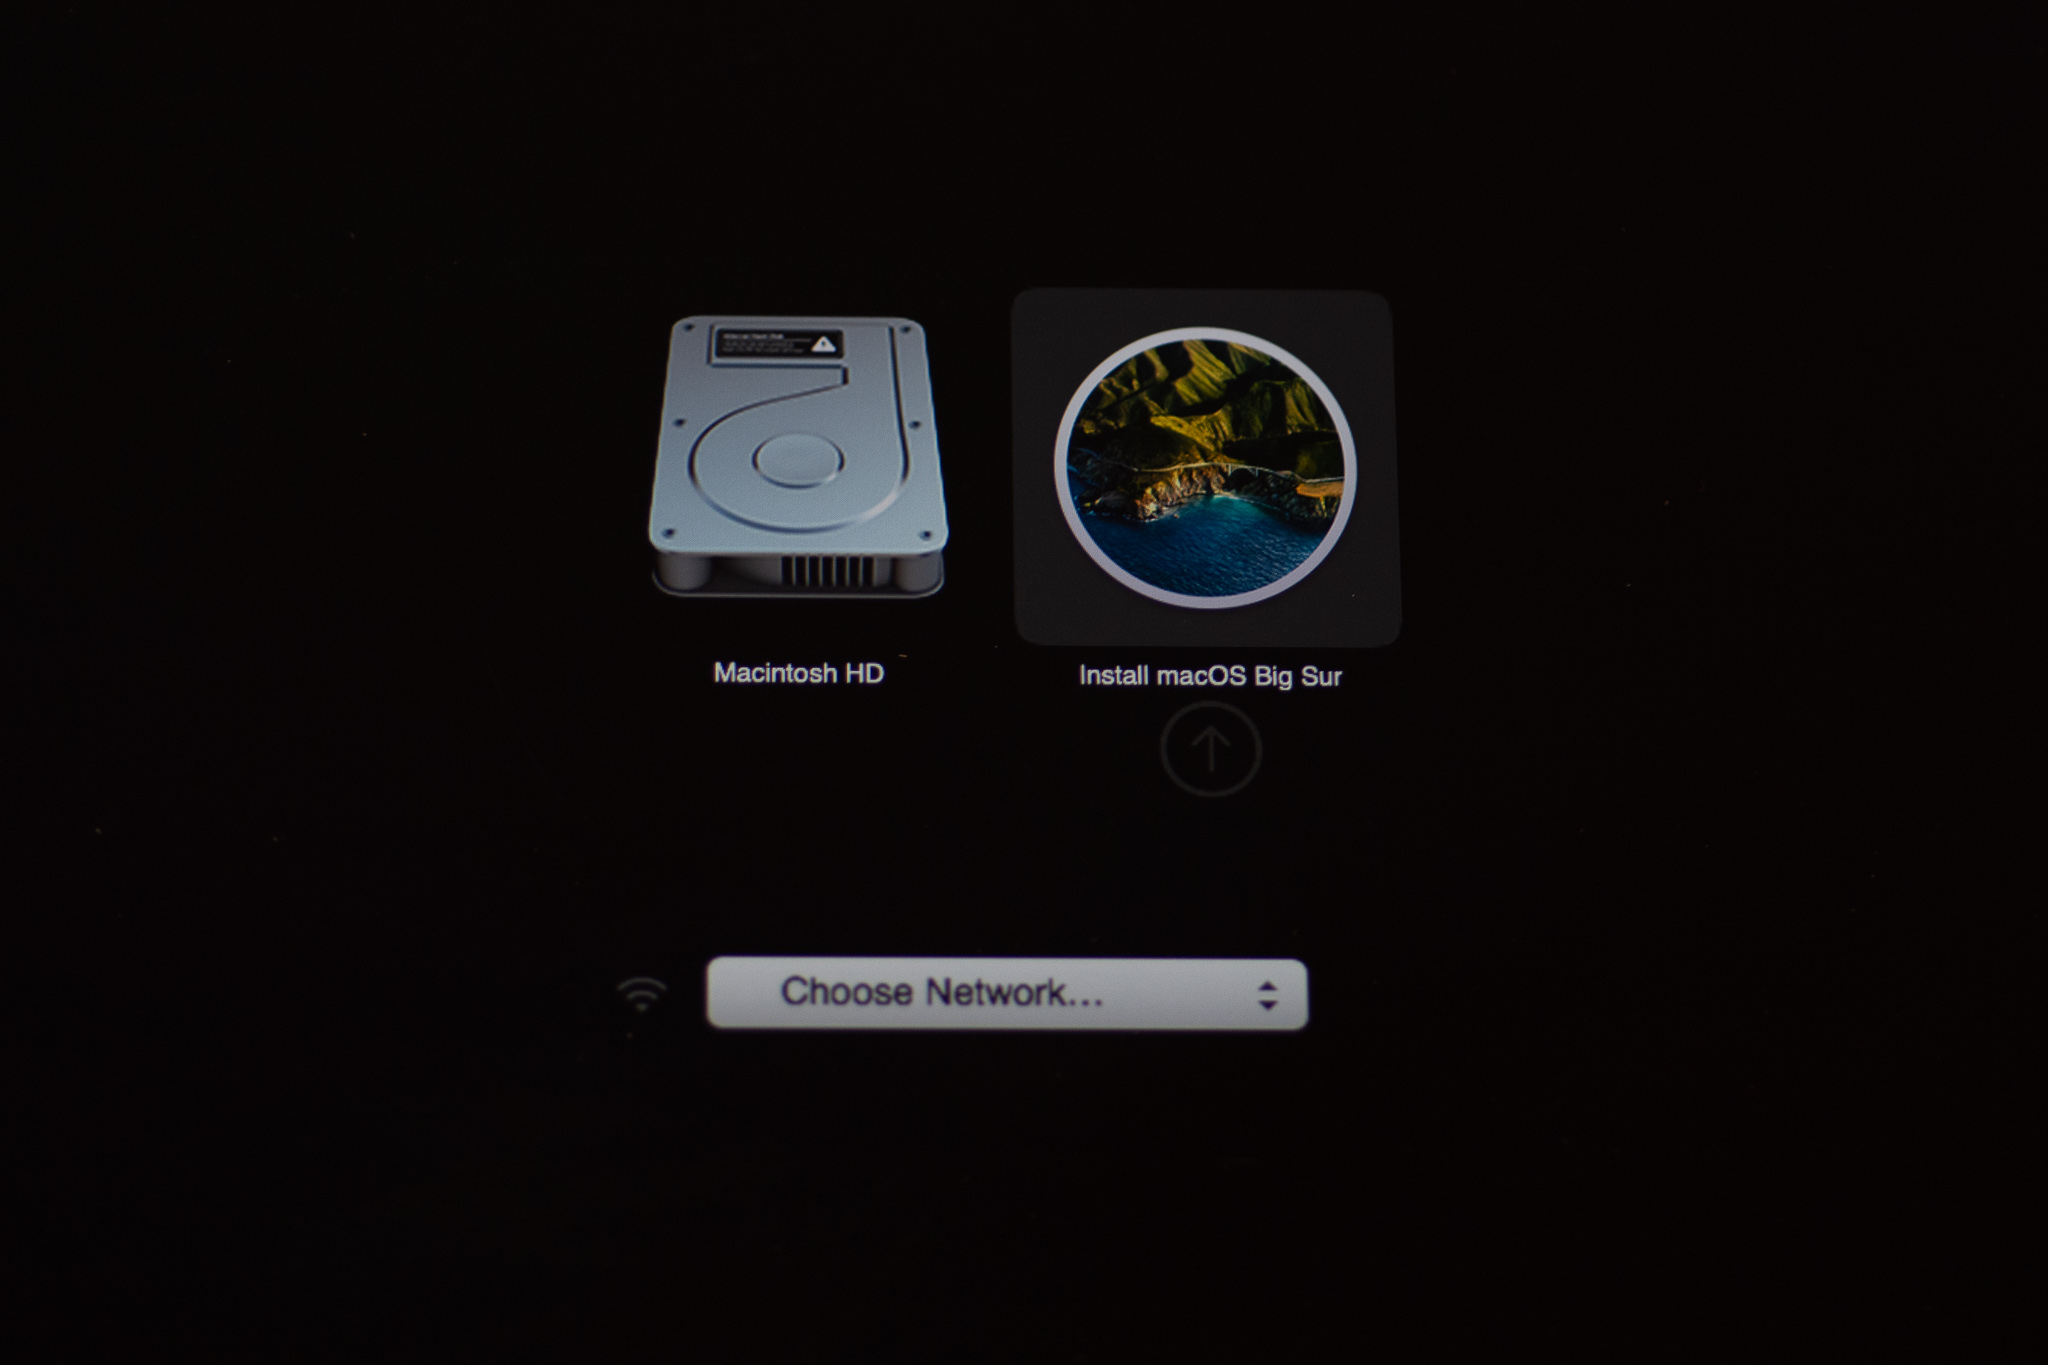
- When a Startup Manager screen appears, click on the name of your flash drive to use it as the startup disk. Click Continue to move further.
- Then click Install macOS from the menu to boot from it and follow the instructions.
FAQ
The Bottom Line
Even if you think that nothing can go wrong with your Mac or that you won’t need a macOS USB installer, it is still best to create one. You can never know for sure when that occasion comes up, but having a ready-to-use portable macOS installer can sometimes save you lots of time and nerves.


